Editor's ZPM replication

  • 4.3K Views
  • Last Post 29 June 2023
editor posted this 07 November 2022

Hello All!

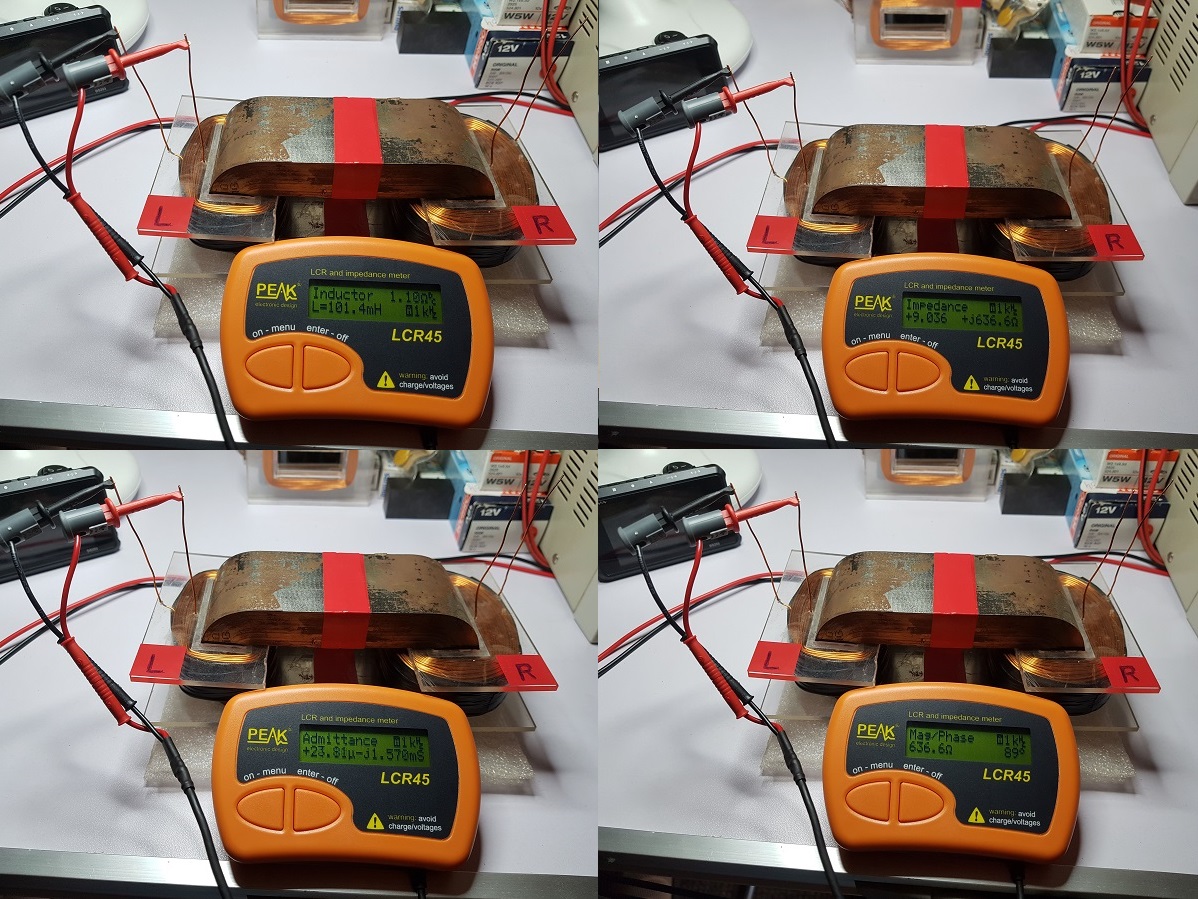
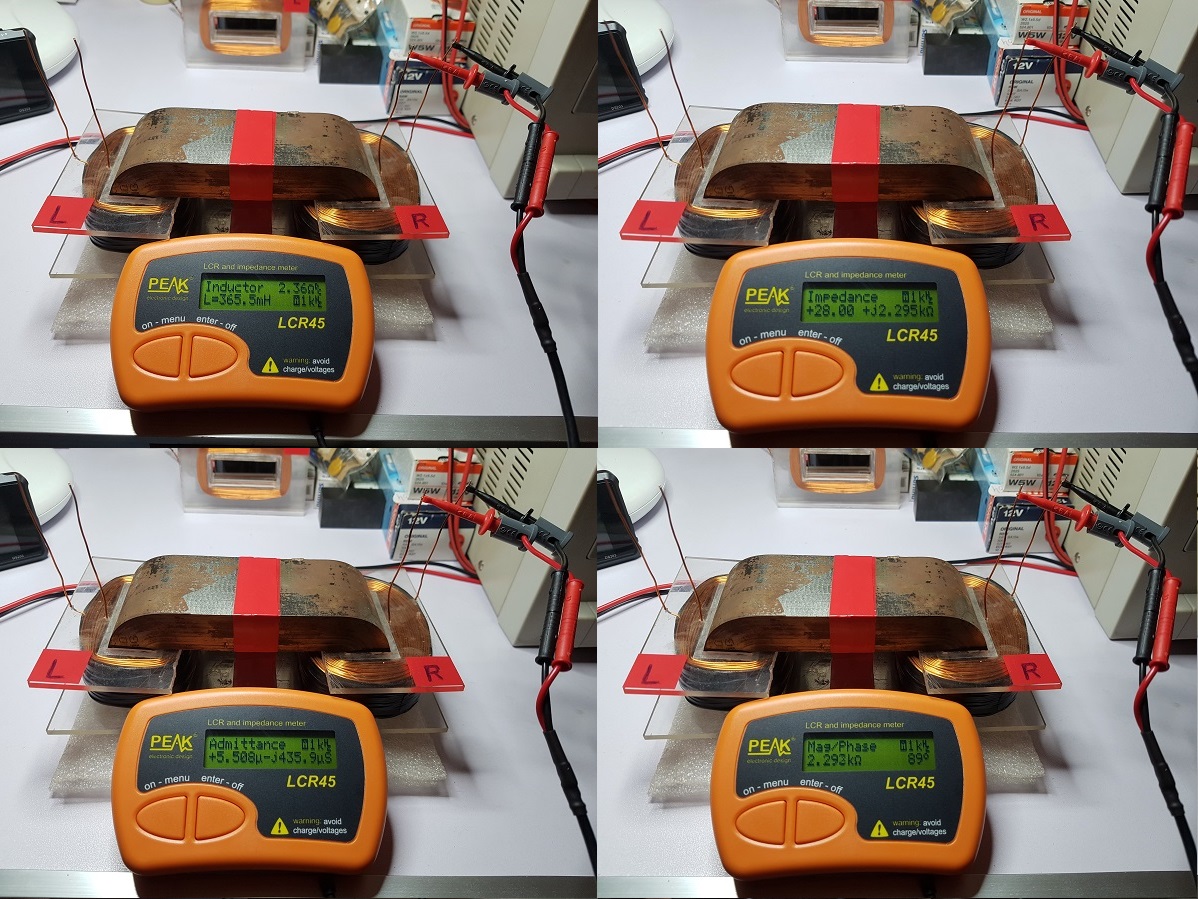
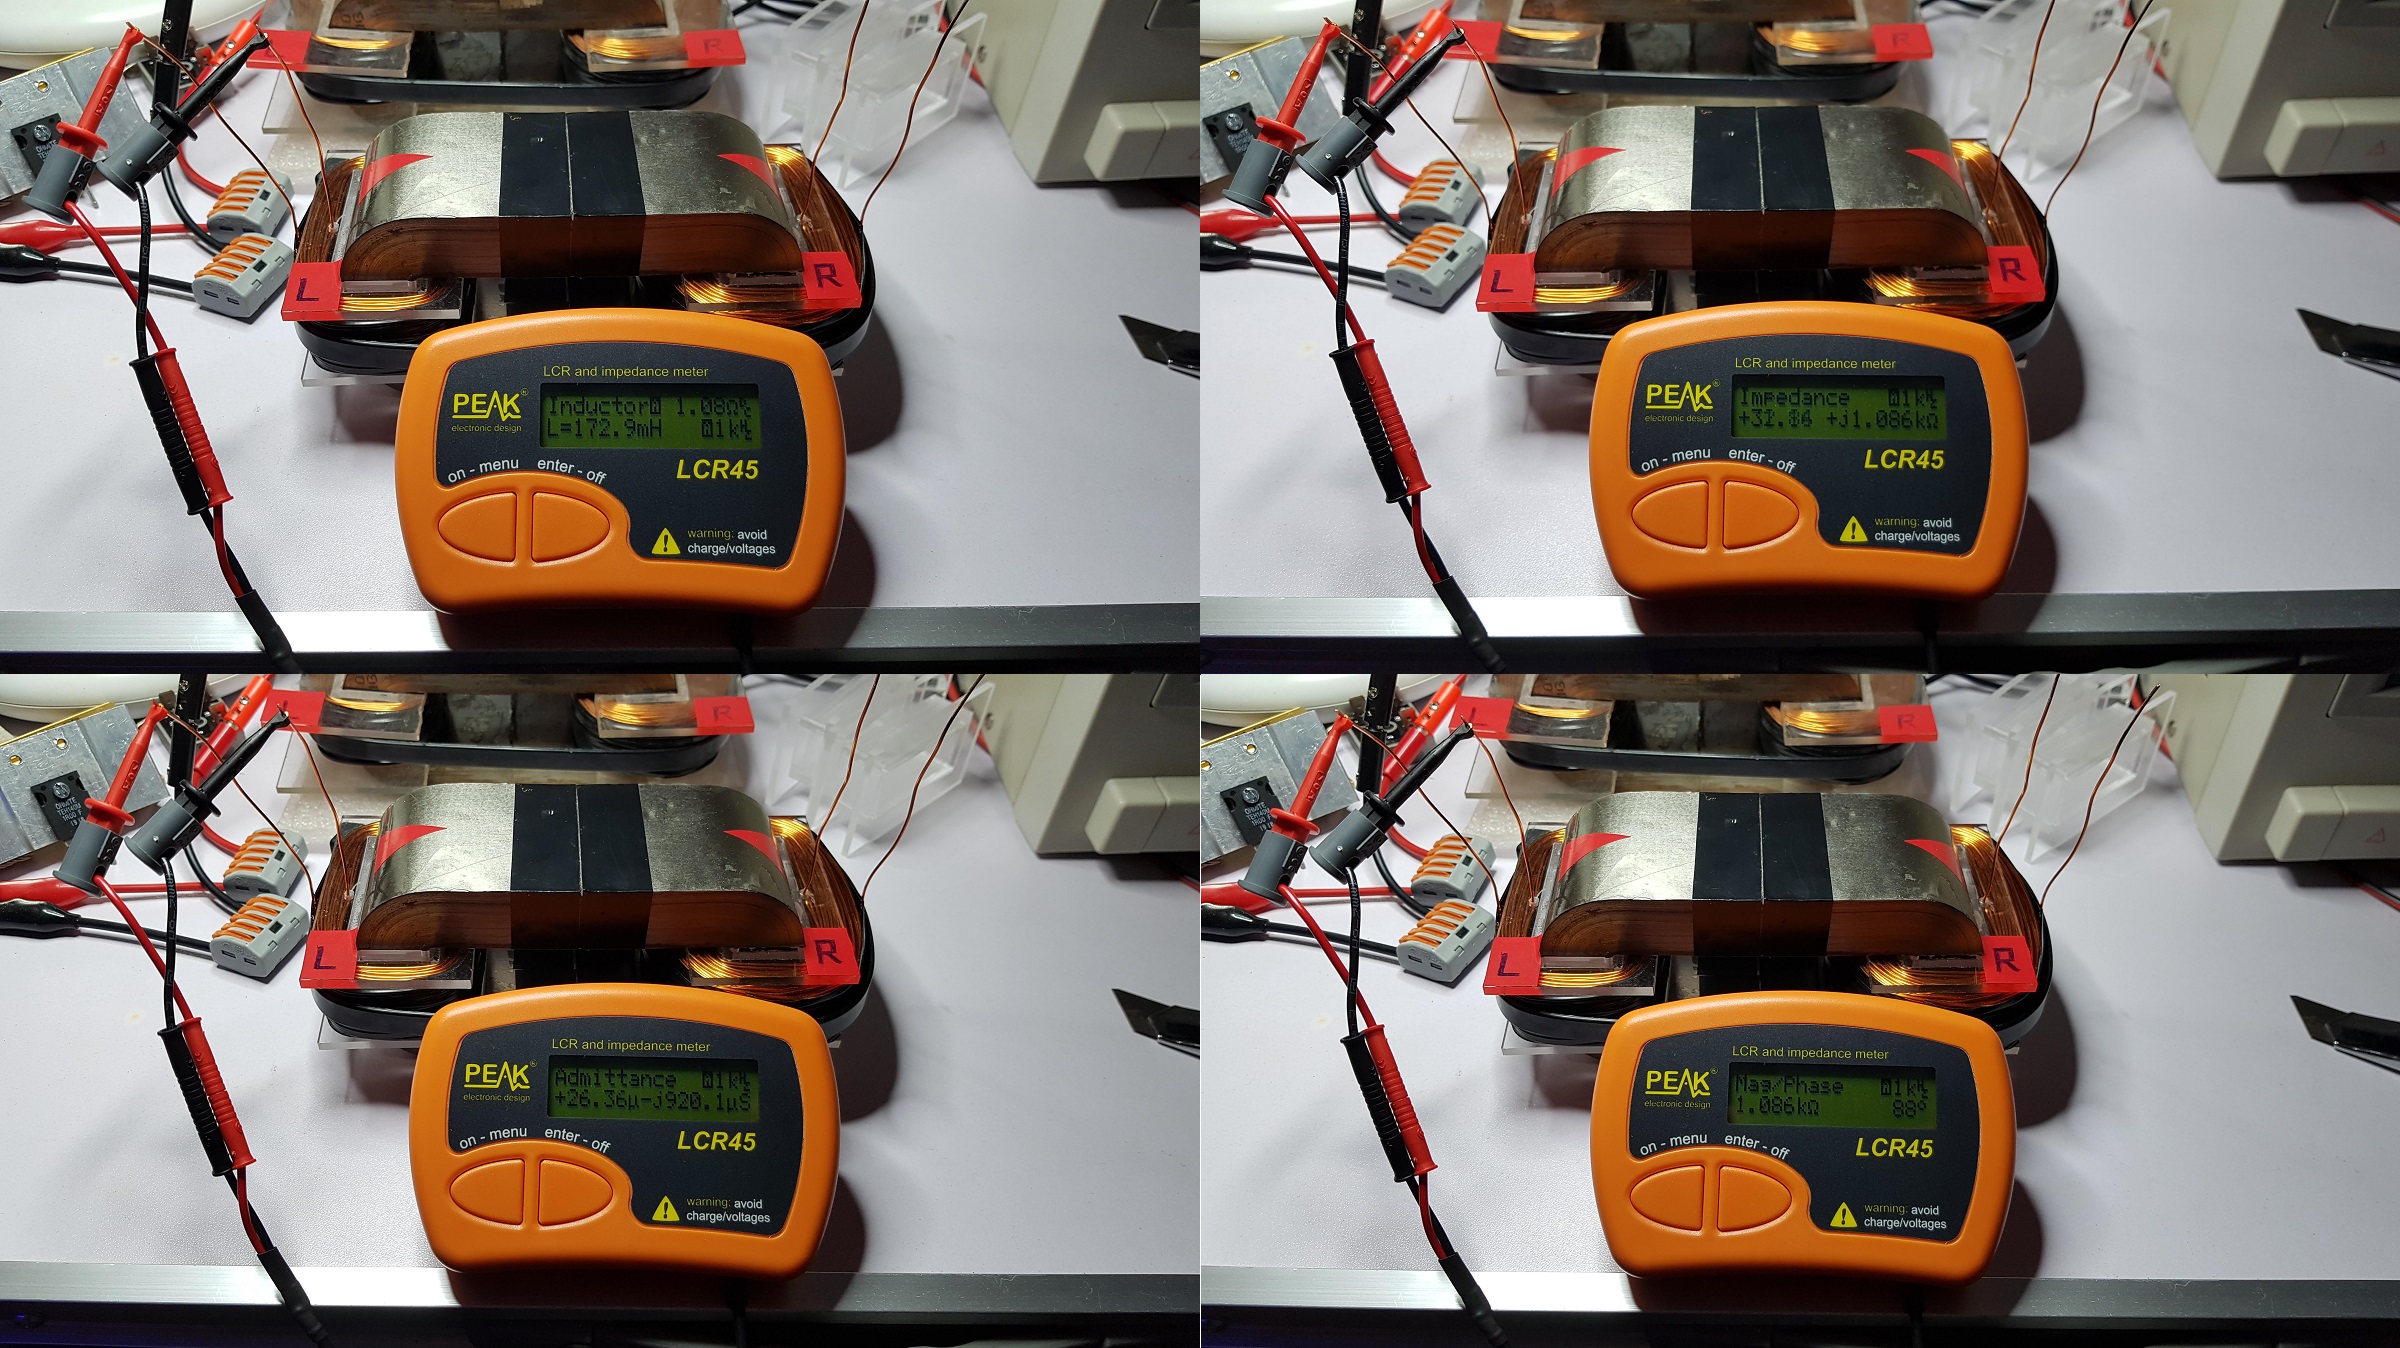
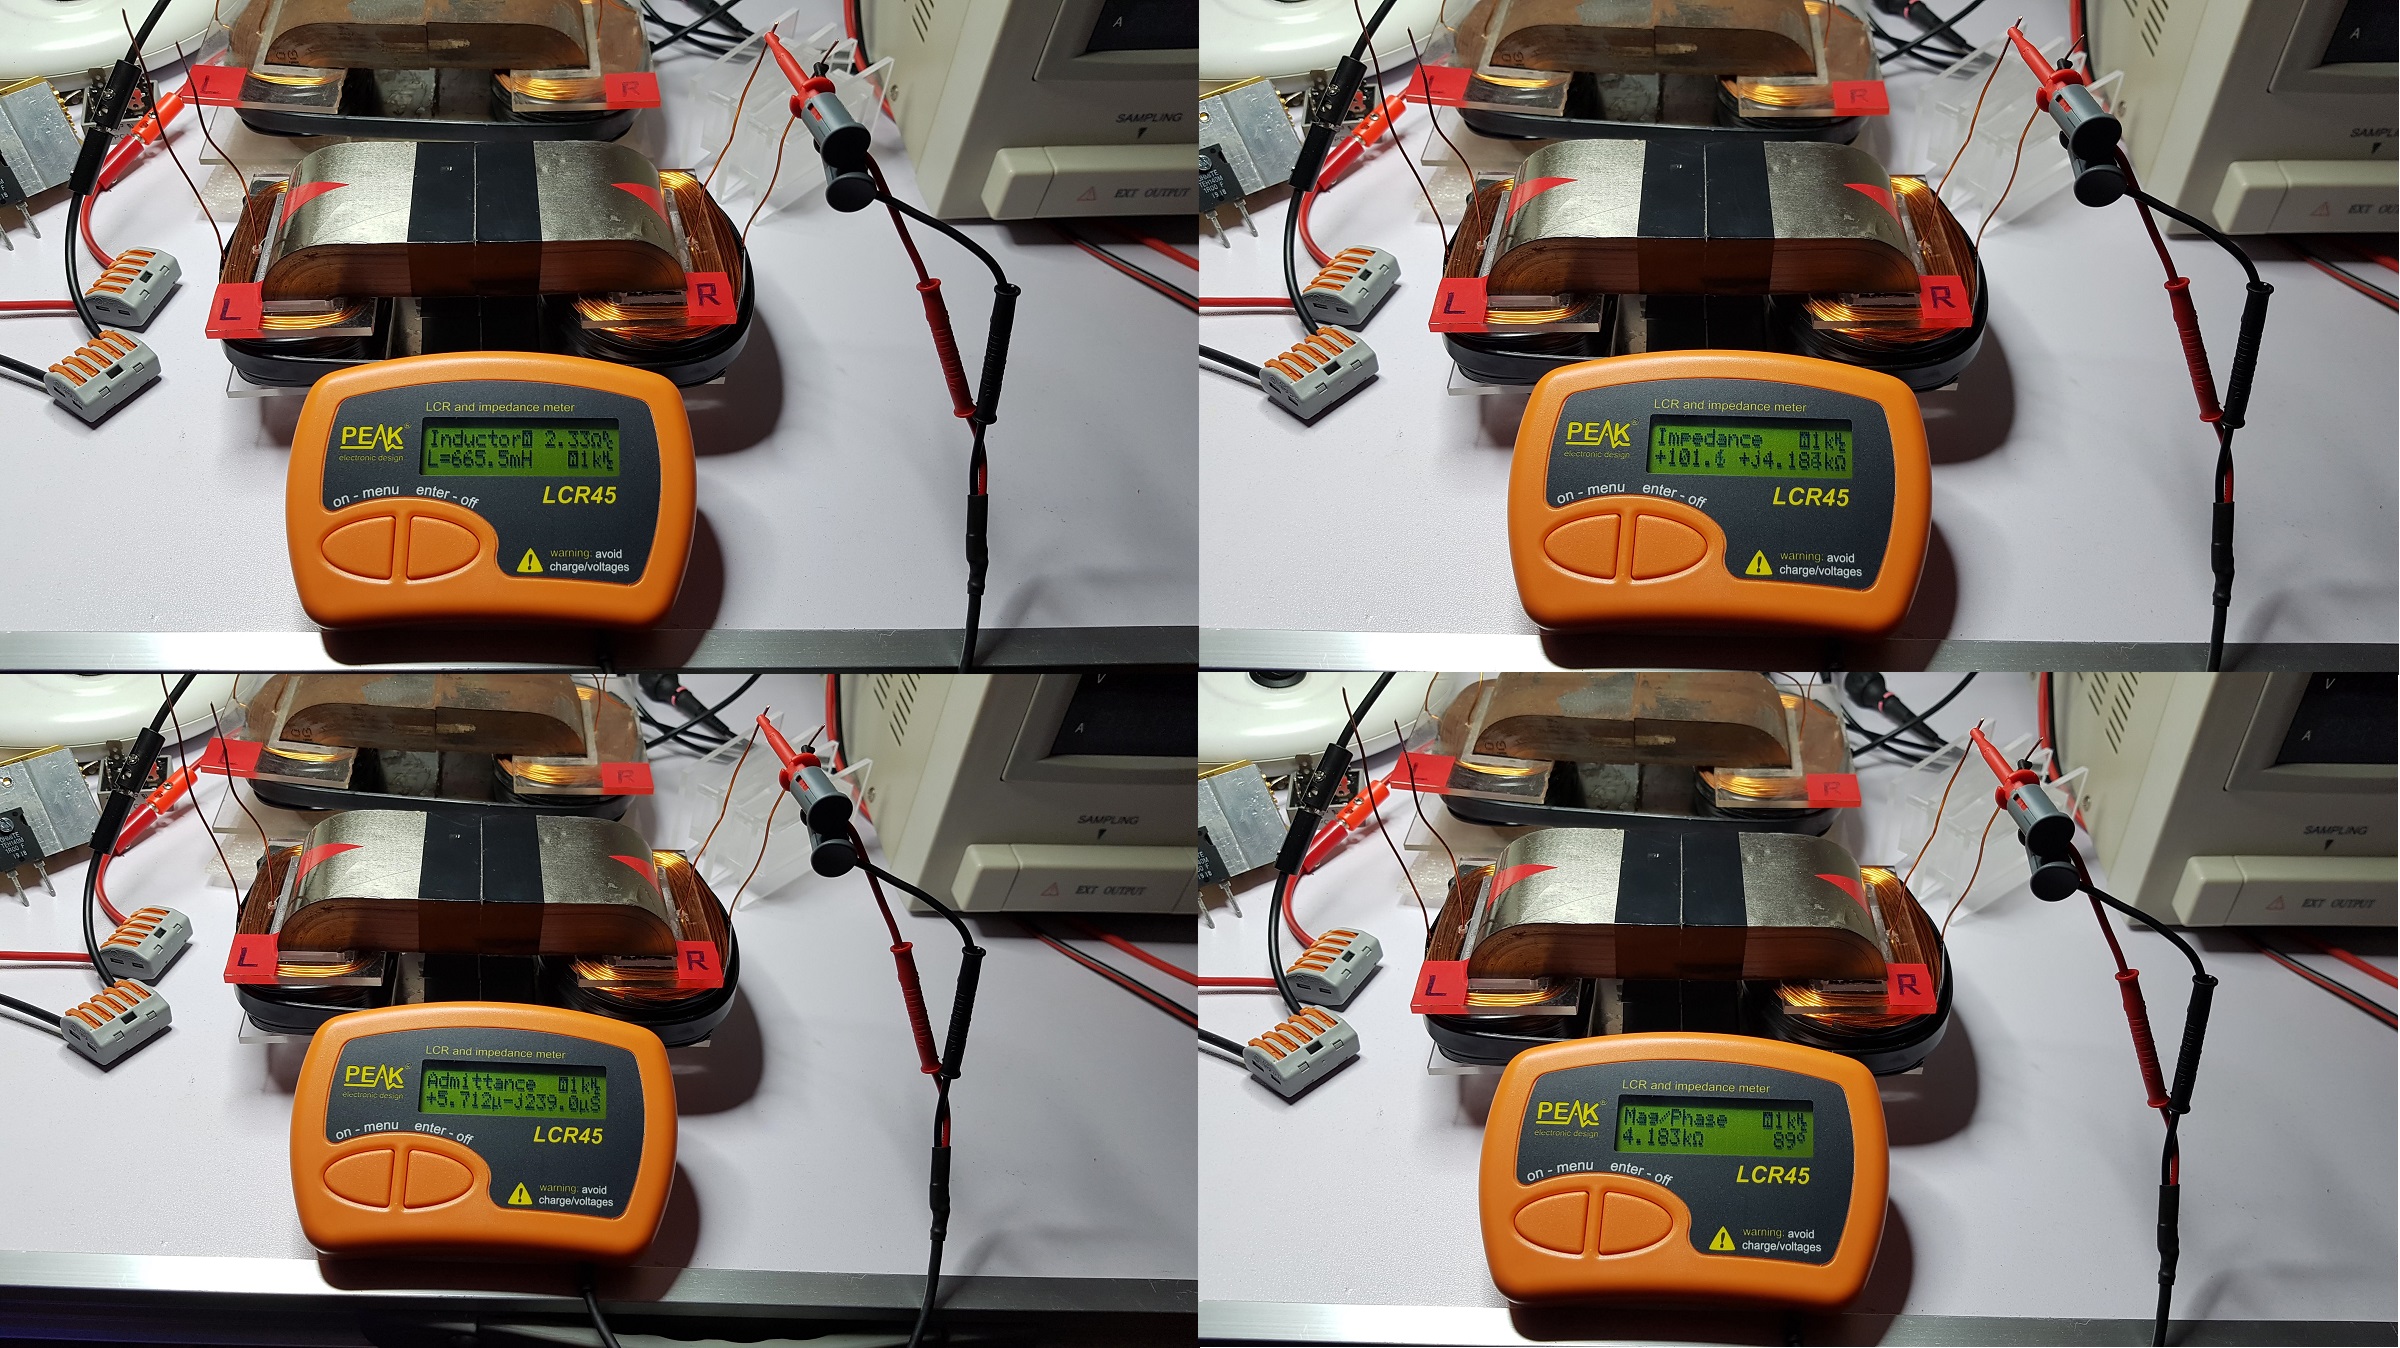
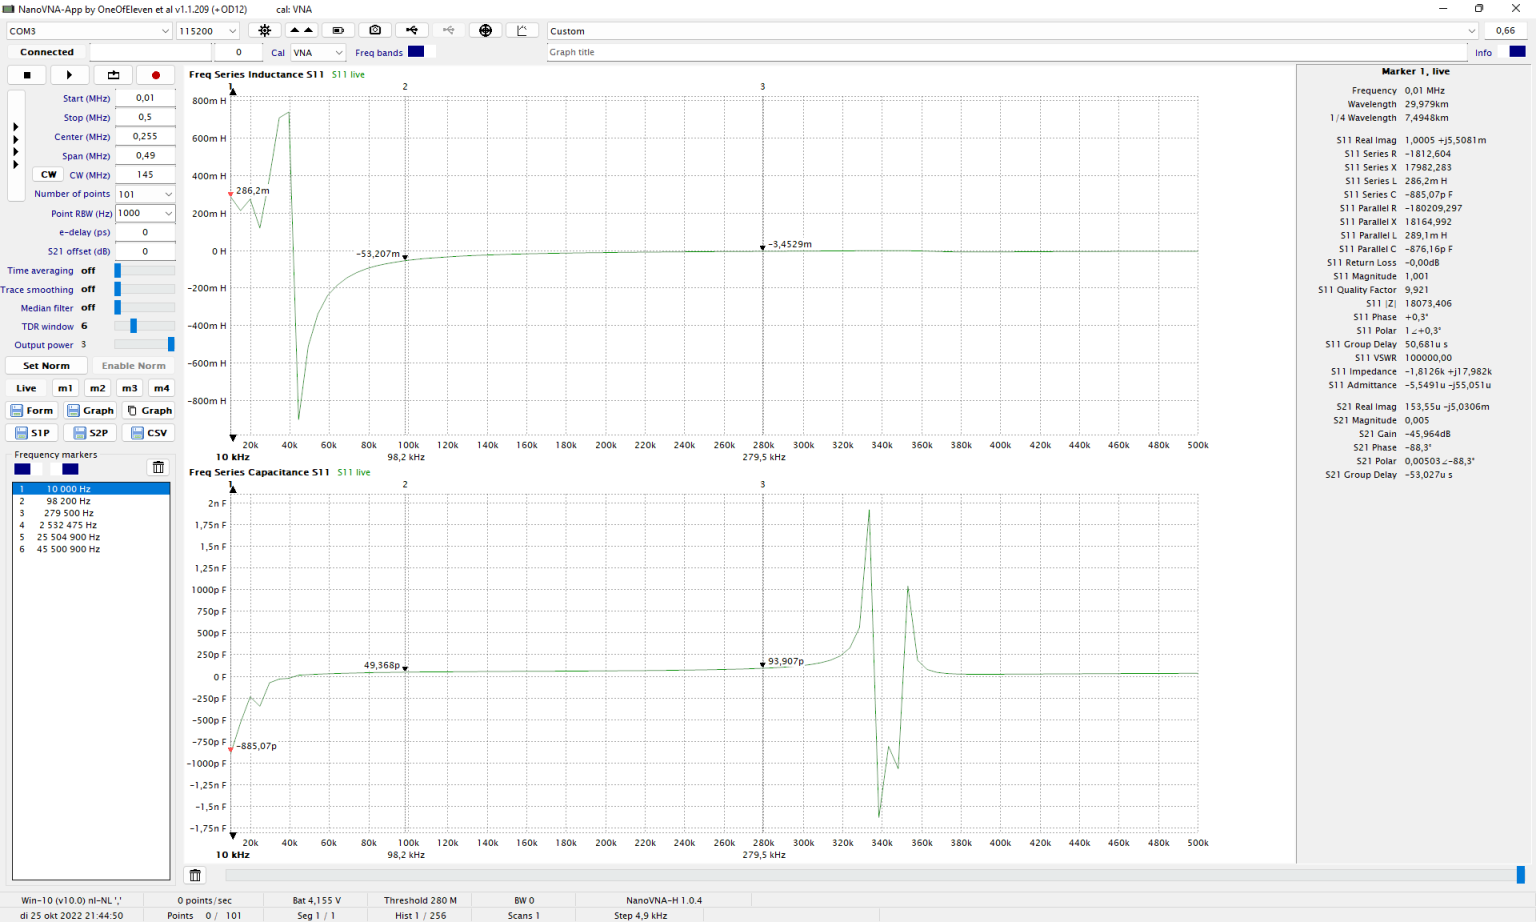
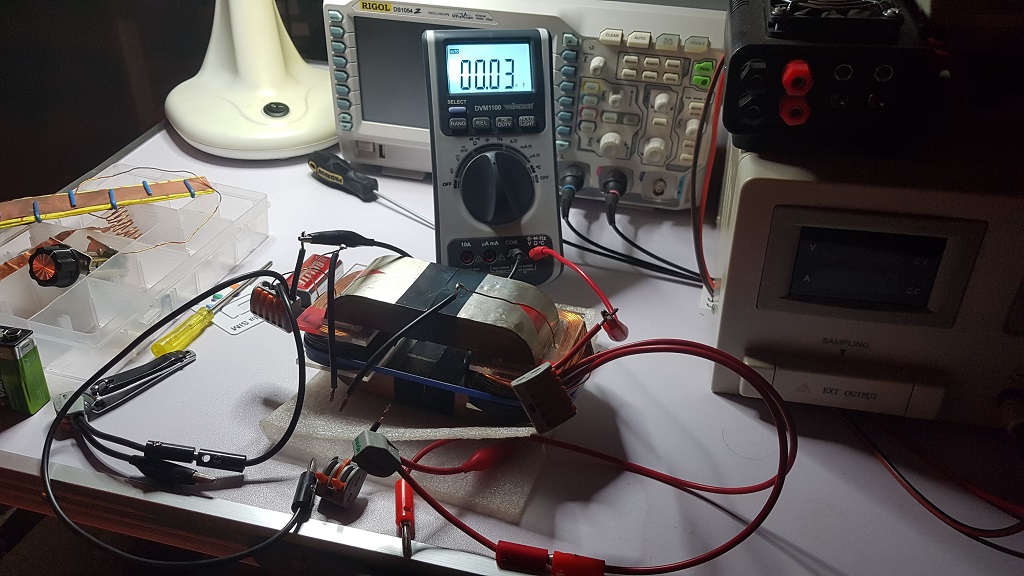
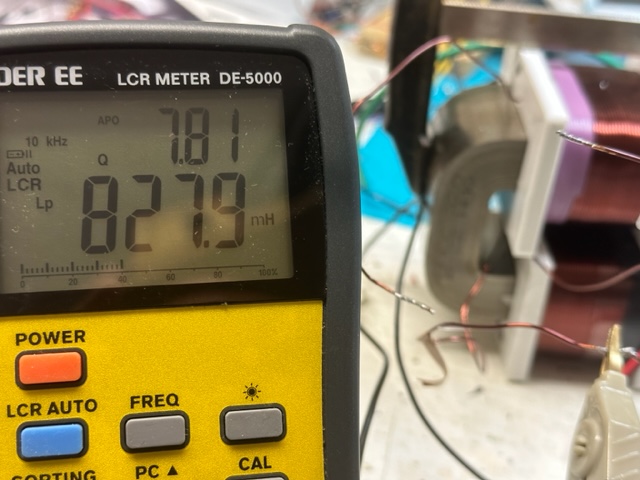
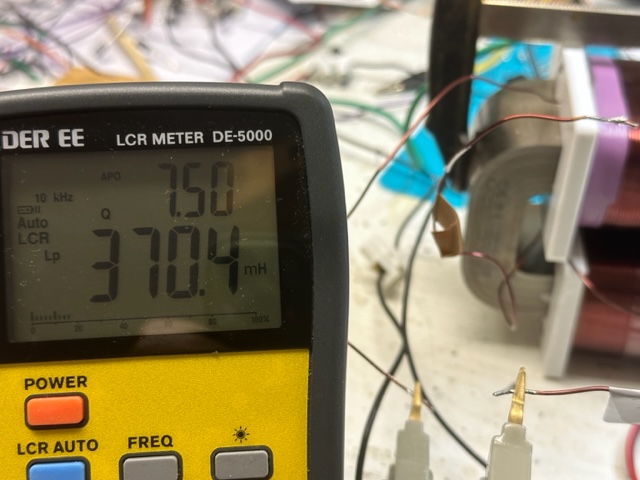
I was in touch with the Fighter and now I decide to show what is going on and to get some new ideas on how to get the signal that we all expect. Below is a quick video showing the simple setup. The coils are 1mm L1 cw 210T (370mH), L2 280T ( 828mH). 


The poles were tested with the phone app named Pole detector, works ok.

I have built some other coils too, with different turn numbers but the output was almost the same.

I have 2 different grounds to play with. I did use the regular power supply but my home appliances were not happy at all, so I decided to isolate everything.

For sure there are differences from Fighter setup, like the core, the position of the coils, the voltage, not sure about the ground.

the video:šŸ˜


bre


Fighter posted this 12 November 2022

Hi Atti,

While building the ZPM prototype and later the ZPM replica I measured each coil separately with my LCR meter. What interested me in the measurements was the inductance.

The measurements are in the ZPM threads but I'm adding them here for reference.

ZPM prototype left coil:

ZPM prototype right coil:

ZPM replica left coil:

ZPM replica right coil:

For more details just click on each image and the Image Magnifier will show that image at its real dimensions.

As a note: I did set the testing frequency of my LCR to "auto", you'll notice the LCR measured the coils using 1 KHz frequency. On "auto" the LCR choose automatically the optimal testing frequency which can be 1 KHz, 15 KHz or 200 KHz but don't ask me how that optimal frequency is selected for each measured component because I don't know the answer.

Here is the page of the LCR on manufacurer's site:

https://www.peakelec.co.uk/acatalog/lcr45-lcr-impedance-meter.html

And attached is the manual containing details about it, especially the meaning of the information shown on its display.

Regards,

Fighter

"If you want to find the secrets of the universe, think in terms of energy, frequency and vibration."
Nikola Tesla

Attached Files

Itsu posted this 13 November 2022

Replying To: editor

Editor,

you mentioned this a few posts back:

 He got the stl file to print the coil formers. If anybody needs one I can post it here.

Although i do not have a 320 core, i might be able to adjust them for my 200 core, so could you please post them?

Thanks,  Itsu


Itsu posted this 13 November 2022

Atti,

when measuring my both open ended coils using my LCR meter i noticed that above 10kHz they went from measuring  positive induction to negative induction (capacitance) at 100kHz.

So at 10kHz the 200 turn coil was like 280mH and at 100kHz it went to -60mH then the LCR meter automatically switched over to 43pF.

So i used my nanoVNA to plot the inductance and capacitance of this 200 turn coil over a 10kHz to 500kHz range, see the first post in my Fighter replication on OUR.com forum here:

https://www.overunityresearch.com/index.php?topic=4374.msg101654#msg101654 

You there see the switching from positive inductance to negative inductance (capacitance) and vice versa copied here:

Also in that post is stated the reason of this which can be boiled down to the influence of the core material and the capacitance of the wires making up the coil.

Regards Itsu


editor posted this 13 November 2022

Hello All,

i've been a bit busy lately, but i manega to get my main ground cable to the other shop.

Thanks all for posting here I will investiga later. For now here are the files Itsu!


I don't know how to add files to this post, so I uplouded them to wetransfer:

https://we.tl/t-Jmo7ZBMHbq

the link will work for 7 days, so Please Figter if you can somehow add them to the post bebore they run out of time.

The original fili was done in Fusion 360 ( free) also includet in the zip.

Itsu i hope this helps a bit. They are printed with PLA, and I always have to file them a bit, my cheap printer is not extra  precise, after the filling then i use 1sec glue and glue the complete former. Then I add the two halves on the core and glue them together gently so they fit perfectly in the core. After a few min I remove the former, glue some more and then you are ready for the wire. It happened twice that the sides broke off when i was winding the wire, the materil just did't hold it. That was before my 1sec glue method.


br,e

Attached Files

Fighter posted this 13 November 2022

Quoting:editor

I don't know how to add files to this post, so I uplouded them to wetransfer:

https://we.tl/t-Jmo7ZBMHbq

the link will work for 7 days, so Please Figter if you can somehow add them to the post bebore they run out of time.

No worries, I just attached them to your post.

Regards,

Fighter

"If you want to find the secrets of the universe, think in terms of energy, frequency and vibration."
Nikola Tesla
Atti posted this 13 November 2022

Hello everyone!


Fighter.

I understand the inductance data. But actually, I would be interested in the value of the capacity between the L and R coils.
So one wire of the multimeter is at one end of the L coil (the other is free) and the other wire of the munimeter is at one end of the R coil (and the other is free)
Probably very little or immeasurable.
But if there is an opportunity, it is only for orientation.

Itsu, thanks for the information. Useful data.!

Thank you, Atti.


Fighter posted this 17 November 2022

Quoting:Atti

So one wire of the multimeter is at one end of the L coil (the other is free) and the other wire of the munimeter is at one end of the R coil (and the other is free)
Probably very little or immeasurable.

Hi Atti,

Is this the measurement you had in mind ? I disconnected the coils from each other and placed the multimeter's probes on one end of each coils:

The multimeter is set on capacitance and auto-range.

It reads 0.03 nF.

Regards,

Fighter

"If you want to find the secrets of the universe, think in terms of energy, frequency and vibration."
Nikola Tesla
Atti posted this 17 November 2022

Hi Fighter.


Yes. Thanks for the measurement. This value was predictable.

In the meantime, they warned me because of the wrong wording that this is not self-capacity but parasitic capacity.
A so-called structural capacitance due to the proximity of the two windings and this affects the coupling between the two. Obviously, it does not matter whether the connection between the two coils is tight or loose. Thus, the value changes accordingly. Even if its value is small, it can have an impact. But since the operating frequency is high, it must still be considered as an influencing factor.

Thank you, Atti.

Fighter posted this 17 November 2022

Sure, no problem !

How they name it doesn't really matter.

Don Smith and so many teachers like him told us: any coil have its own resistance but also its own capacitance; also depending on the wire length each coil will have its own specific frequency value at which point it enters in resonance; Don Smith calls it "super-conductivity condition at room temperature", meaning its resistance goes down to 0 or close to 0 and there the overunity begins.

Regards,

Fighter

"If you want to find the secrets of the universe, think in terms of energy, frequency and vibration."
Nikola Tesla
  • Liked by
  • Inception
  • Shadow_
editor posted this 17 November 2022

Hello!

It looks like one of my PS is having a minus connected to ground, looks interesting, using this one:

https://www.wimo.com/en/psu-1228-digital?queryID=70437eb1ff83f7a274e70ed80b6ca8c6&objectID=28085&indexName=wimo_live_wimo_b2c_eu_en_products

But currently I'm missing another inverter to completely separate the oscilloscope. I will post when I fix this.


have a good day or night, e

Close