Romanian ZPM (Zero Point Module)

  • Topic Is Locked
  • 3.5K Views
  • Last Post 12 February 2023
  • Topic Is Solved
Fighter posted this 07 February 2023

This is the imported thread (from the old aboveunity site) about my ZPM:

For references I will keep the original posting date for every imported post.

Note: This thread is public, everyone can see it, even the visitors which are not members here.

For the posts made by former aboveunity members which are not members on our site I'll use a member placeholder named UndisclosedMember.

Regards,

Fighter

"If you want to find the secrets of the universe, think in terms of energy, frequency and vibration."
Nikola Tesla
  • Liked by
  • Jagau
  • Inception
UndisclosedMember posted this 24 June 2019

Hi Fighter,

I would invest in small precision resistors.

You could use those shunts, but there will be a large error margin because of the super high Ampere rating: 200A

Also I did not see a defined Resistance, assuming ( 0.00038 Ohms from Ohms Law ), and did not see any accuracy rating: ±5%

I would find some 0.1 Ohms precision resistors. It will make life very much easier!

Measure Mean Input:

Measure Mean Output:

NOTE: If your PSU is Grounded to the same Ground as your Scope, you may have an issue here.

Ohms Law, I = V / R gives us a 10x factor ( 0.1 Ohms ) that's why the Current Probe is 10x then its just:

Vmean x Imean = Pmean

It would be nice as I PM'd you, to put big Caps in there to smooth out the DC Ripple, but most scopes today should be able to sort this out!

  • Liked by
  • Inception
Fighter posted this 24 June 2019

Adding the missing information translated from the Romanian store I actually bought them from (about one year ago).

It say maximum voltage 24V. On output of ZPM I could have spikes of high voltage I guess.

Description:

The input voltage range is 6-24V, and overvoltage will cause permanent damage. The green and black cables are plugged into small screws, do not fit into large screws because they affect precision. The direction of shunt current is from the green thread to the black thread.

Technical specifications:

• Model: 200A / 75mV
• Precision level: 0.5-1
• Overload capacity: 120% of rated current, 2 hours
• Resistance to shock frequencies: 80 ~ 120 times / min, 6 hours
• Voltage drop: 75mV
• Environmental conditions: -40 to + 60 ° c
• Size: 119 x 21 mm

"If you want to find the secrets of the universe, think in terms of energy, frequency and vibration."
Nikola Tesla
  • Liked by
  • Inception
Fighter posted this 24 June 2019

Thank you for the schemas and for advice, I appreciate...

"If you want to find the secrets of the universe, think in terms of energy, frequency and vibration."
Nikola Tesla
  • Liked by
  • Inception
UndisclosedMember posted this 24 June 2019

Hey Fighter,

I know you already know how to measure DC Power Fighter, more so for other readers. šŸ˜‰

  • Liked by
  • Inception
Vidura posted this 24 June 2019

here a very cheap precision shunt, 10  1ohm 1% metal film resistors in parallel, for a 0.1 ohm shunt. good up to 3-4 amps:

@ Fighter , when you continue tests it would be nice to see a scope shot from the mosfetgate when the ZPM is on load.

Thank's VIDURA.

Vidura

  • Liked by
  • Inception
Fighter posted this 25 June 2019

Hey Fighter,

I know you already know how to measure DC Power Fighter, more so for other readers. šŸ˜‰

Theoretically I know how but never did it, I always used multimeters and where needed gate-rectifiers šŸ™‚ So the schemas you posted really helps, thanks !

"If you want to find the secrets of the universe, think in terms of energy, frequency and vibration."
Nikola Tesla
  • Liked by
  • Inception
UndisclosedMember posted this 27 June 2019

Fighter, you asked for some know-how on capacitors. Sorry for delay - am currently very busy.

Here you are.

If you deal with electrolytic caps and fast signals the code word is "low ESR" (see link). These types of capacitors are specified for 100KHz as well. Use of such caps is at SMPS (switch mode power supply) devices - as example.

But you will probably not find a model with (a) low ESR AND (b) 10 mF capacity. Additionally it makes no real sense in your setup as you deal with a frequency around 500KHz. At this freqeuncy this cap does not see the frequency at all. It hides successfully behind the high ESR (series resistor).

But there is a trick available:

Adding different capcitors (value / type) in parallel. Then it does not matter if you have huge amps pulses or fast high frequency ones. Every shape of signal will find its proper "drain" to sink in. Such a cascade could look like:

  • 1000µF electrolytic (not necessarily low ESR)
  • 100µF electrolytic low ESR
  • 10µF electrolytic low ESR
  • 1µF ceramic
  • 100nF ceramic
  • and more  - depending on application

In case of problems you might add at every stage (for test) a second one and see if it makes any difference.

If you consider the knowledge regarding low ESR (see link above) you will understand that we deal with a kind of parasitic series resistor inside the capacitor. Best is to have it low. For ceramic cap types ESR is not really an issue.

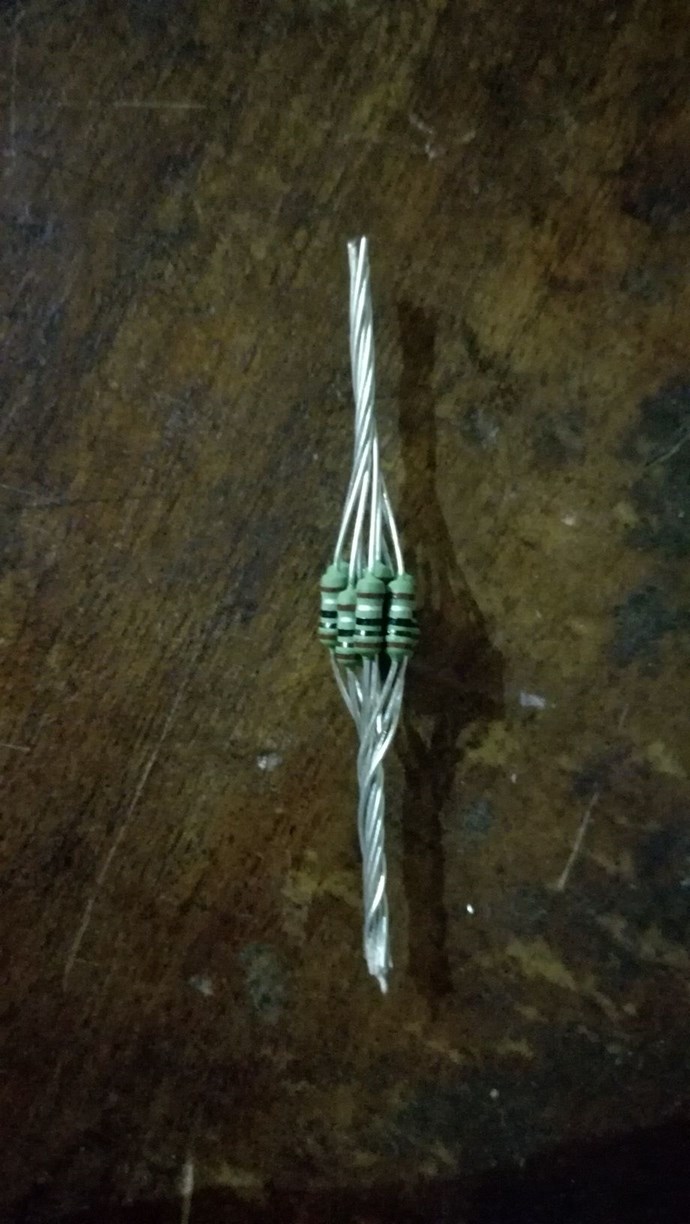
Considering the notion above you might deduct that it is important to not add resistance by tiny little wires if you connect your capacitors. Such setup will add deliberate ESR to any kind of capacitor.

(BTW: I hate those Chinese cables with alligator clips. You see them frequently in many youtube videos. If you use them at small signals it might be OK but NEVER, NEVER use them if you have to consider decent current pulses. Depending on budget please consider those terminals w/ or w/o screw from normal mains installation.

They were invented for huge contact performance. Such wiring at your setup does not look nice but is very healthy :-)) 

Experience:

If you wire a normal 50Hz PSU from rectifier to the smoothing cap and you use fat wire; it is still a huge difference if you wire 8cm or 3cm between rectifier and cap. You see the result immediately at the scope as change in ripple voltage. Sometimes there is no ripple at the capactitor and huge ripple at output if wiring was done wrongly.

So please, obsereve your wiring! If you are not happy with your setup then check (1) wire diameter (2) contact quality and (3) distance. These ingredients if used smartly, perform often as cheap and instant magic.

These hints are not for Fighter only, of course. Physics performs universally for ALL in very same manner!

                                             ~o0o~

  • Liked by
  • Inception
Jagau posted this 27 June 2019

Completely agree with you johnstone

I also hate those Chinese connectors that have a floating contact that we see everywhere on the net,

remove the insulation you will see what I mean. if you want to keep them made like me solder them.

I had to repeat several expereinces because of them. Now I have better power cables.

ESR is a must they win to be known, we have to watch too the following:

voltage rating, RMS current rating and one we cannot forget equivalent series or parallel resistance of your capacitor same thing for inductor.


Jagau

  • Liked by
  • Inception
UndisclosedMember posted this 29 June 2019

Isolated circuits:

Recently some of you discussed the use of opto couplers. Please be aware that there is a thread here discussing this topic as well. They proceed in a very professional and skilled manner. Congratulations! This approach is sound but includes many prerequisites and sometimes skills. Circuits are well suited to be converted to final working models.

But there are other approches possible. Please understand there is no good or bad approach. So I will present below my version being applicable for lab use only - quick and not so much dirty :-)

I have tons of 5V wall chargers (USB) laying around - probably everyone. So if you need 5V isolated you give these devices a go. If you use logic level FETs you and they may be satisfied.
In my case I am not and I added 5V -> 15 V 1W isolated DC/DC converters. They are available as 2W version as well and do comply to low budgets. Connect two of them and you have +/- 15V for OP amps ....... So you might be able to compose just out of the box any support for isolated power supply (lower power area up to 24V) and later on you will be able to dismantle and reuse those components at will.

Of course you might choose to work with other wall chrgers and input voltage of i.e 12V and go same path with DC/DC converters. Below some pics just for better understanding.

 I admit, no sane creature would do this for final circuits. But for quick & dirty and reliable lab use it is suitable and I do so frequently.

Please understand: we talk here on LOW POWER signals like opto control for FETs or OPAMPS.

I hesitate to continue with more notions in order to prevent degressing from the main topic here. I will continue on request only in case you need hands-on solutions for your experiment.

Edit:

You may use your standard USB cables as well if you buy those cheap USB breakout PCBs - very convenient!

i.e. type micro USB

  • Liked by
  • Inception
UndisclosedMember posted this 29 June 2019

My Friends,

I would like to encourage more people to follow this path of investigation.

Fighter is showing a lot of really good work! His results appear to be very promising!

I learned the importance of an Earth in SOME Machines.

There is merit to this, Floyd Sweet gave a similar setup the name: The Oscillator

Attached Files

  • Liked by
  • Inception
Close